Transaction Firewall
One of the tools offered within the Web3-Pi ecosystem is the Transaction Firewall.
This simple tool is designed to enhance the security of your interactions with the Ethereum blockchain.
It can be used alongside Web3-Pi or as a stand-alone tool. Likewise, it can be run on the Web3-Pi device itself, or it can be installed on your own machine and use your Web3-Pi's Ethereum node as its gateway.
Prerequisites
- latest version of Node.js
Ubuntu
On Ubuntu or any other recent Debian-based Linux distributions, which includes the Web3-pi, Node.js can be installed directly as follows:
Node.js through Node Version Manager
Alternatively, and perhaps optimally, you can install Node.js through its dedicated version
management tool, nvm - or - Node Version Manager.
To install nvm:
And then, to install and use the latest stable Node.js through nvm:
Installing the Transaction Firewall
Clone the repository
Once Node.js is installed, proceed with the installation of the Transaction Firewall. First, clone its repository:
git clone https://github.com/Web3-Pi/ethereum-transactions-firewall.git && cd ethereum-transactions-firewall
Install the dependencies
Create the configuration file
Transaction Firewall is configured through a dotenv (.env) file, so you will need to
create it and populate it with the required parameters.
(here, we're assuming configuration on a Linux machine using the nano editor):
Sample contents of the configuration file:
node_env=development
server_port=8454
proxy_port=18500
wss_port=18501
rpc_endpoint='http://localhost:8545'
authorized_addr_fn=".auth_addr"
known_contracts_fn=".known_contracts"
contract_abis_fn=".contract_abis"
Of course, if you're running it on your own machine, put the address of your Web3-Pi node
or any other Ethereum node as the rpc_endpoint instead of localhost.
Optional configuration files
Authorized addresses
You can optionally assign a corresponding label to each authorized address. To do this, edit a file .auth_addr, by calling:
and putting the appropriate mapping of contract addresses you'd like to interact with, e.g.:
Known contracts
Analogously, similar labels can be assigned to select contracts.
Edit the .known_contracts file and add something like:
Contract ABIs
Finally, you may further enhance the verbosity of the information displayed by the Firewall in the transaction acceptance UI by providing it with the ABIs of the contracts you specified as known.
To achieve that, add the .contract_abis file with the appropriate ABIs, e.g.:
{
    "glm": [{"constant":true,"inputs":[],"name":"name","outputs":[{"name":"","type":"string"}],"payable":false,"stateMutability":"view","type":"function"},{"constant":false,"inputs":[{"name":"spender","type":"address"},{"name":"amount","type":"uint256"}],"name":"approve","outputs":[{"name":"","type":"bool"}],"payable":false,"stateMutability":"nonpayable","type":"function"},{"constant":true,"inputs":[],"name":"totalSupply","outputs":[{"name":"","type":"uint256"}],"payable":false,"stateMutability":"view","type":"function"},{"constant":false,"inputs":[{"name":"sender","type":"address"},{"name":"recipient","type":"address"},{"name":"amount","type":"uint256"}],"name":"transferFrom","outputs":[{"name":"","type":"bool"}],"payable":false,"stateMutability":"nonpayable","type":"function"},{"constant":true,"inputs":[],"name":"PERMIT_TYPEHASH","outputs":[{"name":"","type":"bytes32"}],"payable":false,"stateMutability":"view","type":"function"},{"constant":true,"inputs":[],"name":"decimals","outputs":[{"name":"","type":"uint8"}],"payable":false,"stateMutability":"view","type":"function"},{"constant":true,"inputs":[],"name":"DOMAIN_SEPARATOR","outputs":[{"name":"","type":"bytes32"}],"payable":false,"stateMutability":"view","type":"function"},{"constant":false,"inputs":[{"name":"spender","type":"address"},{"name":"addedValue","type":"uint256"}],"name":"increaseAllowance","outputs":[{"name":"","type":"bool"}],"payable":false,"stateMutability":"nonpayable","type":"function"},{"constant":false,"inputs":[{"name":"account","type":"address"},{"name":"amount","type":"uint256"}],"name":"mint","outputs":[{"name":"","type":"bool"}],"payable":false,"stateMutability":"nonpayable","type":"function"},{"constant":true,"inputs":[],"name":"version","outputs":[{"name":"","type":"string"}],"payable":false,"stateMutability":"view","type":"function"},{"constant":true,"inputs":[{"name":"account","type":"address"}],"name":"balanceOf","outputs":[{"name":"","type":"uint256"}],"payable":false,"stateMutability":"view","type":"function"},{"constant":true,"inputs":[{"name":"","type":"address"}],"name":"nonces","outputs":[{"name":"","type":"uint256"}],"payable":false,"stateMutability":"view","type":"function"},{"constant":false,"inputs":[{"name":"holder","type":"address"},{"name":"spender","type":"address"},{"name":"nonce","type":"uint256"},{"name":"expiry","type":"uint256"},{"name":"allowed","type":"bool"},{"name":"v","type":"uint8"},{"name":"r","type":"bytes32"},{"name":"s","type":"bytes32"}],"name":"permit","outputs":[],"payable":false,"stateMutability":"nonpayable","type":"function"},{"constant":true,"inputs":[],"name":"symbol","outputs":[{"name":"","type":"string"}],"payable":false,"stateMutability":"view","type":"function"},{"constant":false,"inputs":[{"name":"account","type":"address"}],"name":"addMinter","outputs":[],"payable":false,"stateMutability":"nonpayable","type":"function"},{"constant":false,"inputs":[],"name":"renounceMinter","outputs":[],"payable":false,"stateMutability":"nonpayable","type":"function"},{"constant":false,"inputs":[{"name":"spender","type":"address"},{"name":"subtractedValue","type":"uint256"}],"name":"decreaseAllowance","outputs":[{"name":"","type":"bool"}],"payable":false,"stateMutability":"nonpayable","type":"function"},{"constant":false,"inputs":[{"name":"recipient","type":"address"},{"name":"amount","type":"uint256"}],"name":"transfer","outputs":[{"name":"","type":"bool"}],"payable":false,"stateMutability":"nonpayable","type":"function"},{"constant":true,"inputs":[{"name":"account","type":"address"}],"name":"isMinter","outputs":[{"name":"","type":"bool"}],"payable":false,"stateMutability":"view","type":"function"},{"constant":true,"inputs":[{"name":"owner","type":"address"},{"name":"spender","type":"address"}],"name":"allowance","outputs":[{"name":"","type":"uint256"}],"payable":false,"stateMutability":"view","type":"function"},{"inputs":[{"name":"_migrationAgent","type":"address"},{"name":"_chainId","type":"uint256"}],"payable":false,"stateMutability":"nonpayable","type":"constructor"},{"anonymous":false,"inputs":[{"indexed":true,"name":"account","type":"address"}],"name":"MinterAdded","type":"event"},{"anonymous":false,"inputs":[{"indexed":true,"name":"account","type":"address"}],"name":"MinterRemoved","type":"event"},{"anonymous":false,"inputs":[{"indexed":true,"name":"from","type":"address"},{"indexed":true,"name":"to","type":"address"},{"indexed":false,"name":"value","type":"uint256"}],"name":"Transfer","type":"event"},{"anonymous":false,"inputs":[{"indexed":true,"name":"owner","type":"address"},{"indexed":true,"name":"spender","type":"address"},{"indexed":false,"name":"value","type":"uint256"}],"name":"Approval","type":"event"}]
}
Running the Transaction Firewall
The service is configured and ready to run. To start the service, execute the following command from the main project directory:
On successful startup, the application will print the following (or similar) output:
04-10-24 08:57:20  Websocket server is running on port: 18501
Authorized addresses:
0xaaaaaaaaaaaaaaaaaaaaaaaaaaaaaaaaaaaaaaaa: my address

Known contracts:
0x7DD9c5Cba05E151C895FDe1CF355C9A1D5DA6429: glm

Contracts with ABIs
glm

04-10-24 08:57:20 Transaction Firewall HTTP Server (to accept/reject transactions) is listening on port: 8454
04-10-24 08:57:20 ValidatingProxy is running:
04-10-24 08:57:20   proxy address (endpoint to be used in a wallet): http://diziet.local:18500
04-10-24 08:57:20   Ethereum RPC endpoint used by the firewall:      http://aopi5.local:8545
To start accepting transactions, open the web browser and connect to the Transaction Firewall Server's address. If you're running the Firewall on your Web3-Pi device, ensure that the browser is opened on a machine in the local subnet.
In the default single-device setup, the device name is configured as eop-1,
and the corresponding webpage is: http://eop-1.local:8454. Of course, if your device has
a different hostname, please use that instead.
You should be greeted with the following screen:

Using the Transaction Firewall
The firewall serves as a proxy between your wallet software and the Ethereum node.
With regular calls, like e.g. eth_getBalance, it just parses the incoming call
and directly forwards it to the remote RPC endpoint.
To connect to the Transaction Firewall from the wallet or your web3-enabled application, use the proxy's advertised address - (by default: `http://eop-1.local:18500)
Note
Only one web page instance may be opened at a time.
Opening an additional webpage drops the previous connection and redirects all queries to the current one.
Regular calls
When you issue a call, it will be displayed on the Transaction Firewall's console as:
Note
Although the Transaction Firewall is an asynchronous service, at the moment it serves only one request at a time.
Requests are not queued, and any new requests sent during acceptance of the previous one are automatically forwarded to the configured RPC endpoint.
Transactions
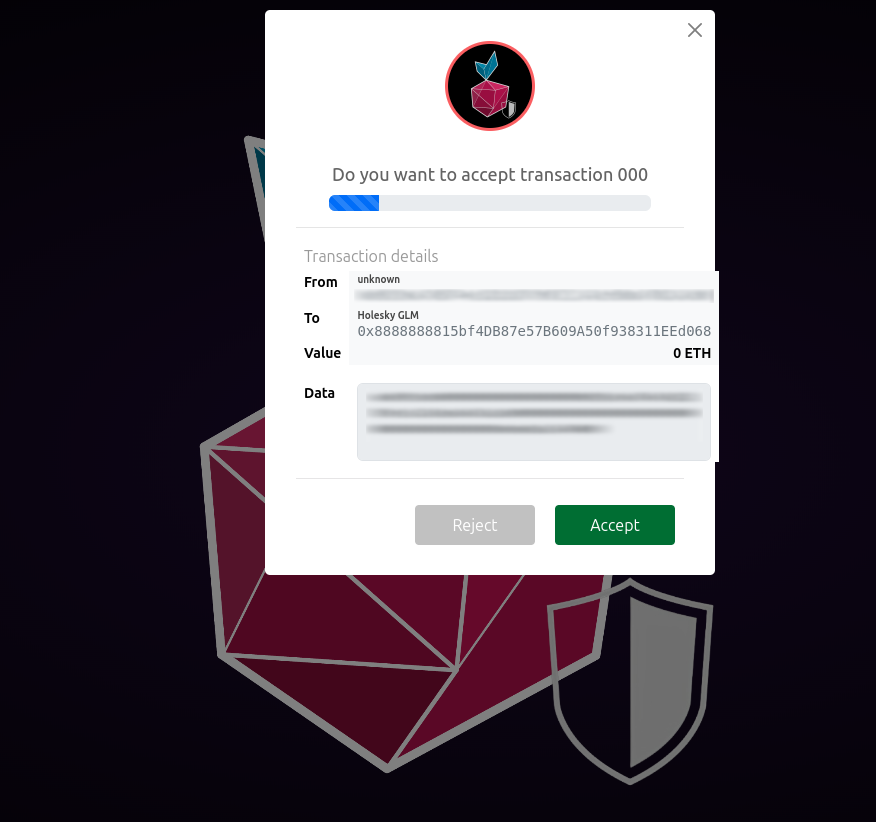
After you send a transaction through the Firewall, the transaction won't be immediately forwarded. Instead, you'll be asked to confirm the transaction within the Firewall's UI.
If you have added any addresses to your authorized addresses file,
when starting the firewall, any addresses used as the To or From of the transaction
will be appropriately labeled.
Similarly, more details regarding the specific transaction will be displayed if you have populated the Known contracts and Contract ABIs files.

If you decide to reject the transaction, it won't be sent to the remote RPC and an error will be reported to your wallet software.
On the other hand, should you accept the transaction, or just allow the timeout to pass, the transaction will be forwarded as just another call.
Warning
If the Transaction Firewall web page is not open, the service automatically forwards all requests to the configured RPC endpoint.
Using the Transaction Firewall with MetaMask
Note
In order for MetaMask to be able to connect to your Web3 Pi node through the Transaction
Firewall, the configuration of the geth client on the Web3 Pi must be updated
to accept requests from any domain.
This is achieved by adding --http.corsdomain *
to the last line of the script that launches geth, namely:
/home/ethereum/clients/geth/geth.sh.
To use the Transaction Firewall while working with MetaMask, you need to configure the wallet to use it as its RPC node address.
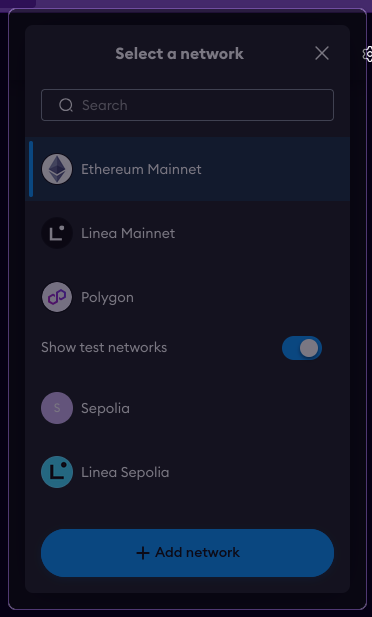
In order to do that, first click the list of the networks in the upper-left corner and use the "+ Add Network" button at the bottom of the window.


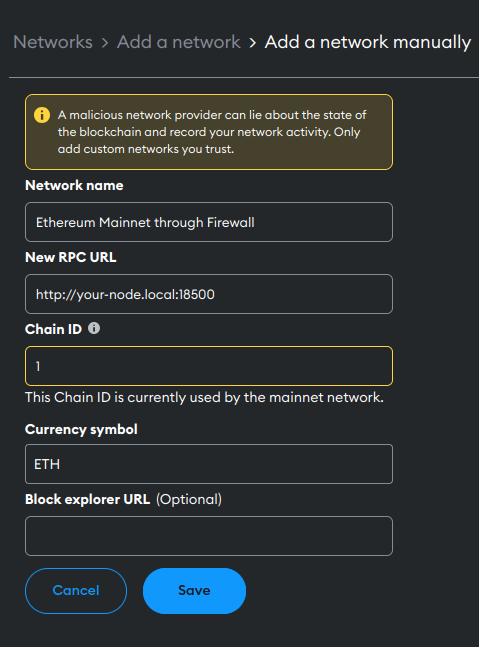
Then, on the resulting screen, click "Add a network manually". You'll be greeted with the following screen which, assuming in this case that the Transaction Firewall is running on your Web3 Pi device, you should fill-in as suggested below:

Once you add the network and set it as default, any operations that you perform in MetaMask, will be passed through the Transaction Firewall.