Single-Device Mode
The following section provides a step-by-step guide for configuring, deploying, and running a full Ethereum Node hosted on a single Raspberry Pi device. While a Raspberry Pi 5 is recommended for optimal performance, a Raspberry Pi 4 and Compute Module 4 (CM4) can also be used.
⚠️ To avoid errors during the first setup, please follow the instructions precisely. ⚠️
Hardware Requirements
- 1 x Raspberry Pi 5 (8GB) with Active cooling
- 1 x 2TB SSD drive (external USB SSD or NVMe m.2 with adapter) - Recommended Hardware
- 1 x SD Card reader/writer
- 1 x microSD Card
- 1 x Power supply
Cooling
Active cooling is required to avoid throttling and keep sufficient performance/stability of the system.
Storage
2 TB fast drive is required. With Raspberry Pi 5 you have three options for storage:
- external USB SSD drive (wide availability)
- m.2 NVMe drive with NVMe HAT for Raspberry Pi 5 (max performance)
- m.2 NVMe drive with USB m.2 adapter
Raspberry Pi 5 has a PCIe x1 connector on board so with a special adapter m.2 NVMe drive can be used. This option gives the maximum possible performance. For more information visit: Recommended Hardware
If you use USB always choose USB 3.0 ports (blue)
microSD Card
Flashing a microSD card takes time, but it can be reduced by using a fast device. Additionally, using a fast micro SD card results in a shorter booting time. A few examples:
More information
https://www.tomshardware.com/best-picks/raspberry-pi-microsd-cards.
Power Supply
As a power supply, we recommend an official PSU 5,1V / 5A for Raspberry Pi 5. Raspberry Pi 5 + 2TB drive can use a significant amount of power so a sufficient power supply is important for stability.
- 1 x Raspberry Pi 4 (8GB) with Active cooling
- 1 x 2TB SSD drive (external USB SSD or NVMe with m.2 to USB adapter) - Recommended Hardware
- 1 x SD Card reader/writer
- 1 x microSD Card
- 1 x Power supply
Cooling
Active cooling is required to avoid throttling and keep sufficient performance/stability on the system.
Storage
2 TB fast drive is required. With Raspberry Pi 4 you have two options for storage:
- external USB SSD drive (wide availability)
- m.2 NVMe drive with USB m.2 adapter
If you use USB always choose USB 3.0 ports (blue)
microSD Card
Flashing a microSD card takes time, but it can be reduced by using a fast device. Additionally, using a fast micro SD card results in a shorter booting time. A few examples:
More information
https://www.tomshardware.com/best-picks/raspberry-pi-microsd-cards.
Power Supply
As a power supply, we recommend an official PSU 5,1V / 3A for Raspberry Pi 4. Raspberry Pi 4 + 2TB drive can use a significant amount of power so a sufficient power supply is important for stability.
CM4 module needs carier board. There are many on the market. Minimum requiments are:
- 1 x Raspberry Pi CM4 (8GB) with Active cooling
- 1 x 2TB fast storage - Recommended Hardware
- 1 x Power supply
- 32GB+ storage for operating system (microSD or eMMC)
Installing Web3 Pi on the CM4 requires more knowledge. CM4 modules come with built-in eMMC memory, and in this case, you need to use the rpiboot application before using Raspberry Pi Imager. If your module does not have built-in memory and uses an SD card, the installation process is similar to a standard Raspberry Pi.
More information can be found on the manufacturer's website: Raspberry Pi Documentation.
In some cases, a bootloader update may be necessary, which is described here: How to Update the Raspberry Pi Compute Module 4 Bootloader EEPROM.
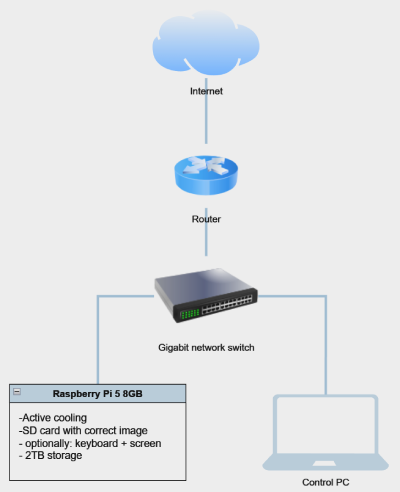
Hardware Connection
After gathering all the necessary hardware, unbox the Raspberry Pi device and connect it as specified below:
Connection Diagram
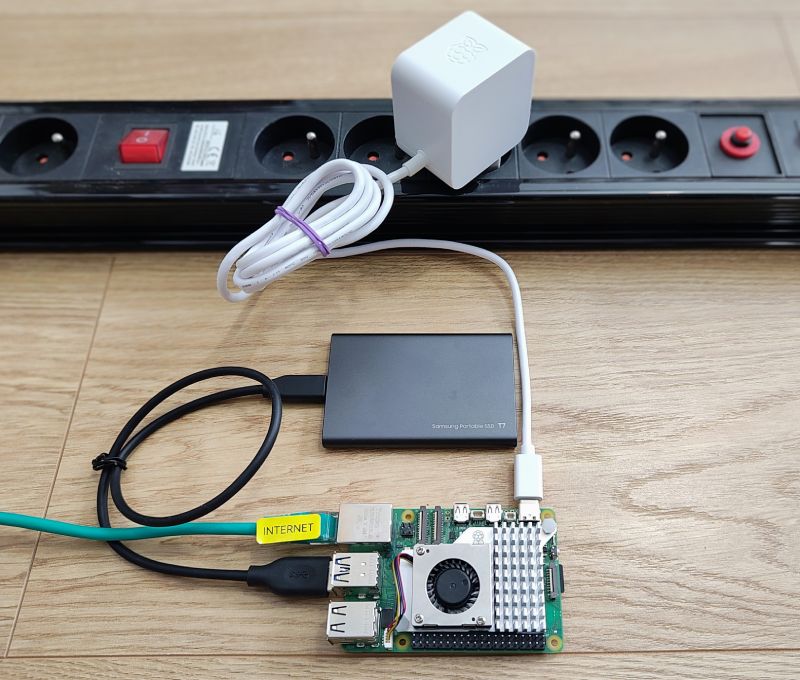
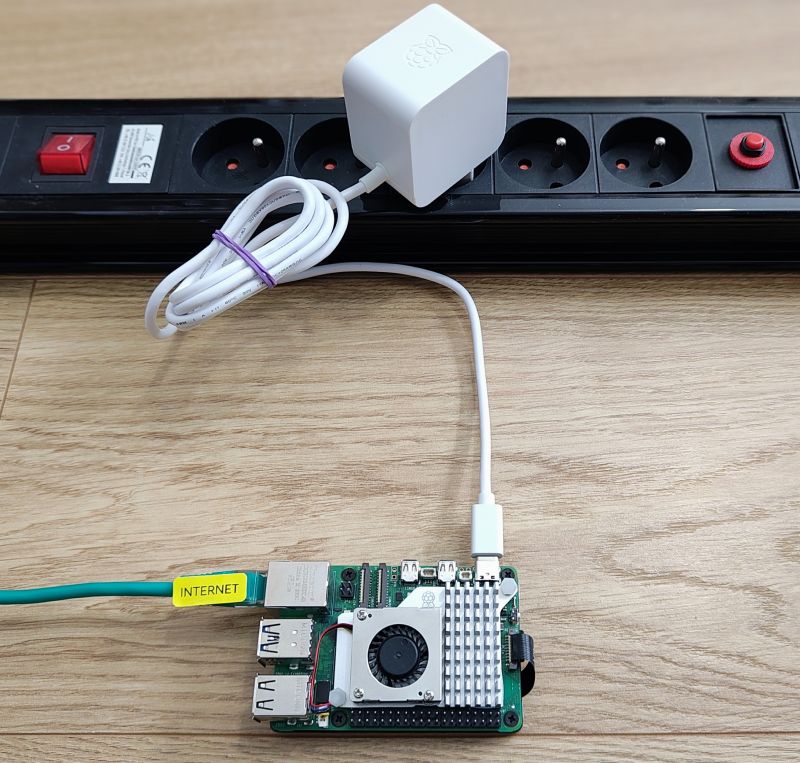
Photos
Below photos illustrate example setups
Sample configuration with USB drive
Sample configuration with NVMe drive
OS Images
The image contains a preconfigured Linux distribution capable of running an Ethereum Node.
Prerequisites
To write an image on an SD card, it is recommended to use the official tool provided by the Raspberry Pi Foundation:
After installing it on your PC, you can download the newest Web3 Pi image. This image will be used on each device, so only one copy is required:
Writing Images
Follow the instructions below to write images on a microSD card.
- Insert a microSD card into a card reader and connect the reader to your PC (You may need microSD to SD adapter)
- Open the Raspberry Pi Imager on your PC
- Choose device type
- Choose the downloaded image as a source image
- Choose the SD card reader as a target device
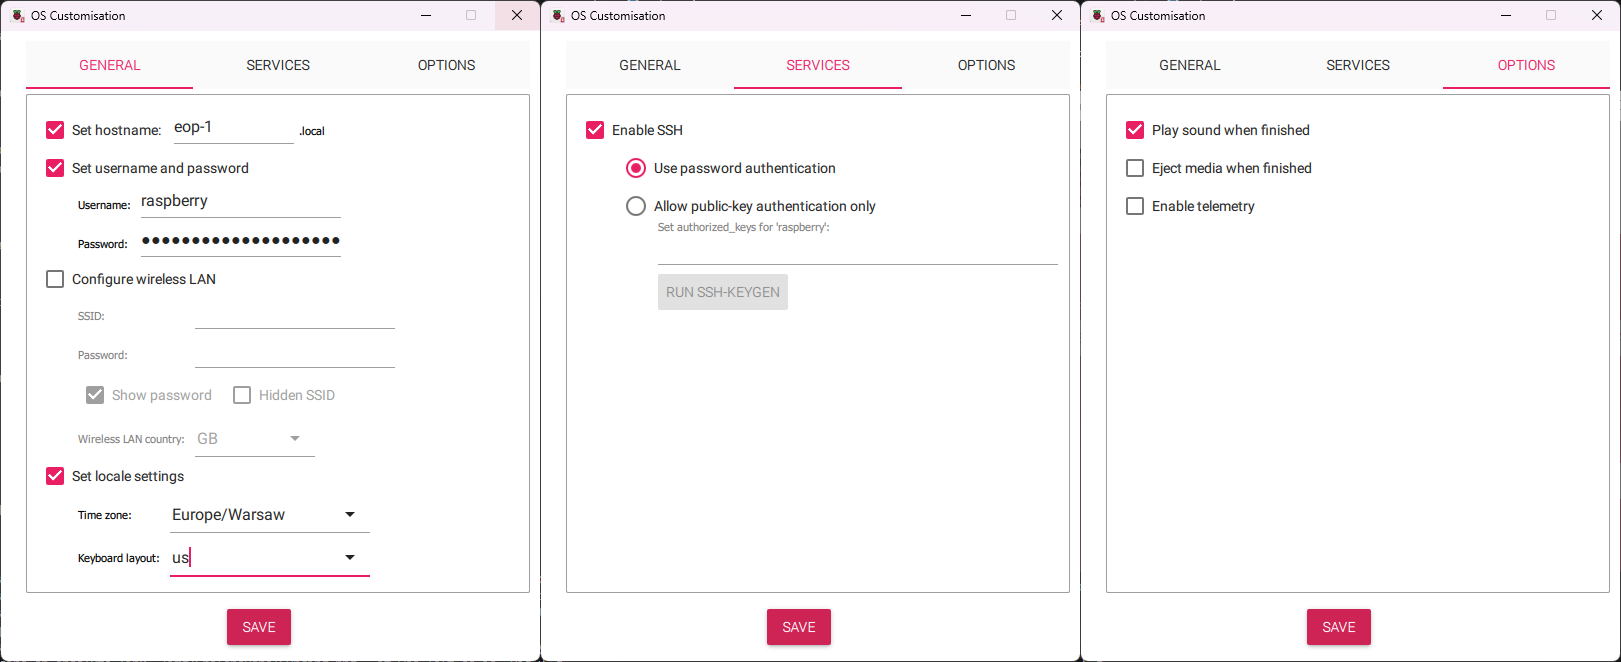
- Perform any custom configuration steps that you need (Check the screenshot below)
- Set hostname to eop-1
- Enable SSH authentication
- Set username and password (e.g., raspberry/raspberry) (Do not change username and password)
- Uncheck "Eject media when finished"
- Write the image to the SD card
- Do not interrupt verify step
Remember the hostname
We use mDNS, allowing users to connect to Raspberry Pi with the hostname instead of the IP address after proper installation.
An example screenshot with settings for the geth node:
Important note
After installation, the SSH username will be ethereum, and the password will also be ethereum. All other users will be disabled.
If some steps remain unclear, you can visit the Raspberry Pi "getting started" page for more information on Image settings and usage.
Initial Configuration
Web3 Pi image uses classic /boot/firmware/config.txt as config file. This allows you to customize your setup before the first run. After writing the image to the SD card you should see a new drive in your PC. There is a config.txt file. This config is for Raspberry Pi but Web3 Pi adds its own sections to it.
# Web3 Pi config - single node
[web3pi]
geth=true
nimbus=true
lighthouse=false

# Monitoring
influxdb=true
grafana=true
bsm=true
bnm=true

#Execution endpoint address
exec_url=http://localhost:8551

[geth]
geth_port=30303

[nimbus]
nimbus_port=9000

[lighthouse]
lighthouse_port=9000

# End of Web3 Pi config
Here you can choose which services will automatically start during boot.
true = service enable
false = service disable
other value or no value = no change
It is recommended to always leave bsm=true
Lighthous vs. Nimbus
Nimbus needs less resources so it is ideal for devices like Raspberry Pi
Installation
The Raspberry Pi device will be configured during the initial run, and its software will be updated. After this step, devices can be used to host an Ethereum Node.
Warning
⚠️ In most cases, the installation script erases the SSD content. ⚠️
Checklist before the installation
- Make sure that the device is configured correctly (i.e., it has a valid active cooling system installed)
- Make sure that you use the correct SSD (2TB or more)
- Internet access is required (default DHCP)
The SSD contents will not be erased if you have already configured Web3 Pi using this SSD. However, to force the installer to erase the configured disk, connect it to any device that you can access and follow these commands:
The installer will forcefully erase the SSD if the file .format_me exists in the/mnt/storage directory.
Installation
- Insert the previously prepared SD card into the device
- Connect the SSD to the USB 3.0 port or use NVMe m.2 drive with PCIe adapter
- Connect the Ethernet cable to the device
- Optionally: connect HDMI cable to the monitor and the device using HDMI 0 port (on the device)
- Connect the Raspberry Pi 5 power supply to the device
After the device is powered up, it will enter the process of updating the software and configuring itself to act as an Ethereum Node.
⚠️ This process can take up to 15 minutes. ⚠️
Installation Verification
Check installation progress by opening http://eop-1.local:7197/node/system/status
When the installation is completed you will see JSON like this:
{"host_name": "eop-1", "num_cores": 4, "cpu_percent": 14.9, "mem_total": 8324055040, "mem_used": 6542295040, "mem_free": 503726080, "mem_percent": 81.8, "swap_total": 0, "swap_used": 4642058240, "swap_free": 12537806848, "swap_percent": 27.0, "disk_used": 1207331737600}
If the site is not available, please wait and try again.
mDNS
mDNS service needs some time to start.
Raspberry Pi over IP address will be accessible quicker than using host name "eop-1.local"
mDNS should be available in less than 15 min from the start.
Grafana Monitoring Verification
Open Grafana dashboard: http://eop-1.local:3000
Default login and password is: admin
You need to change it during first login.
Go to Dashboards menu and then to Ethereum Nodes Monitor panel.
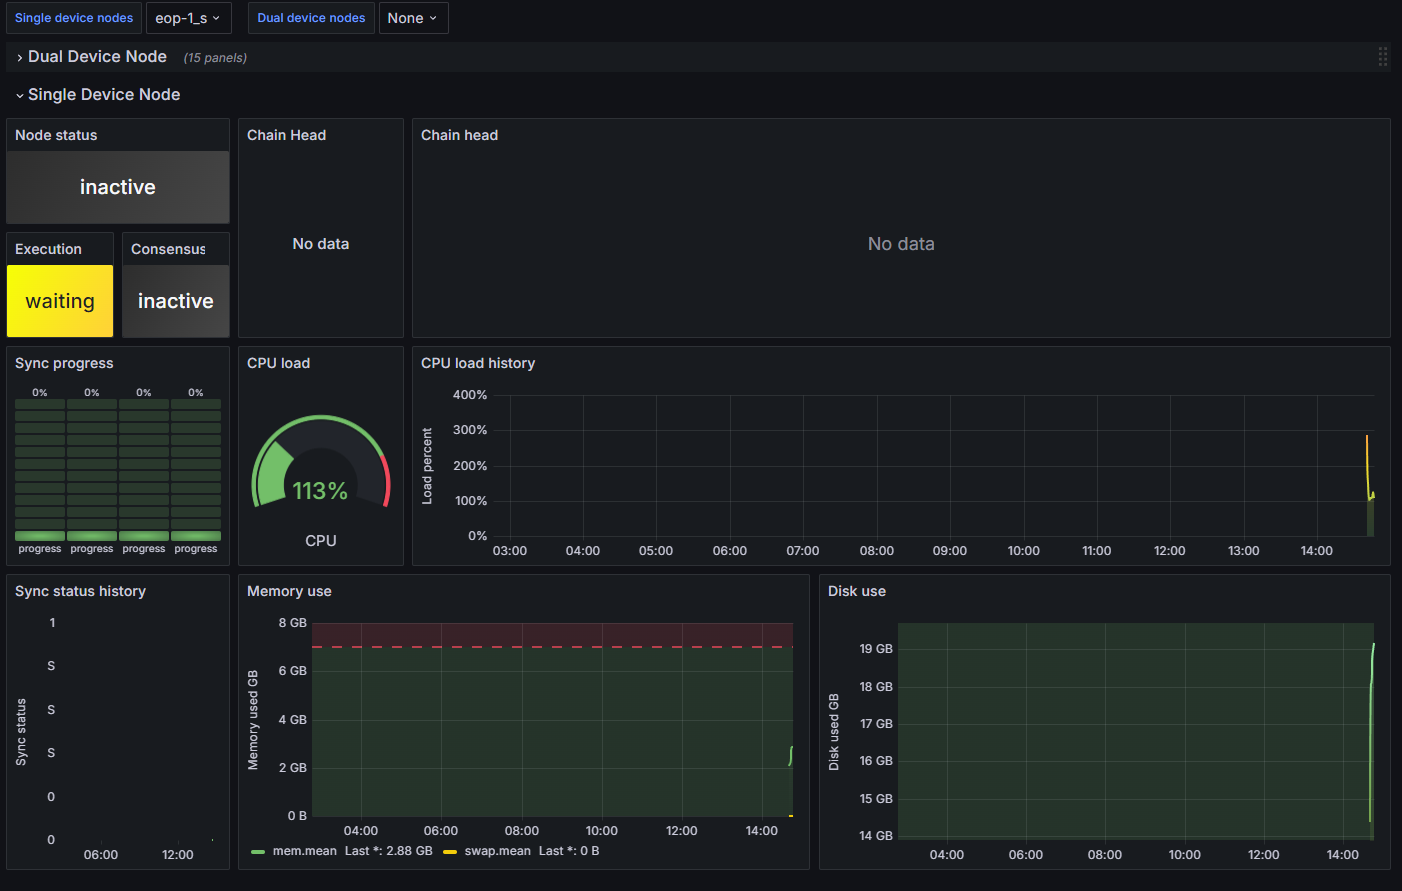
Grafana dashboard/Sync just started
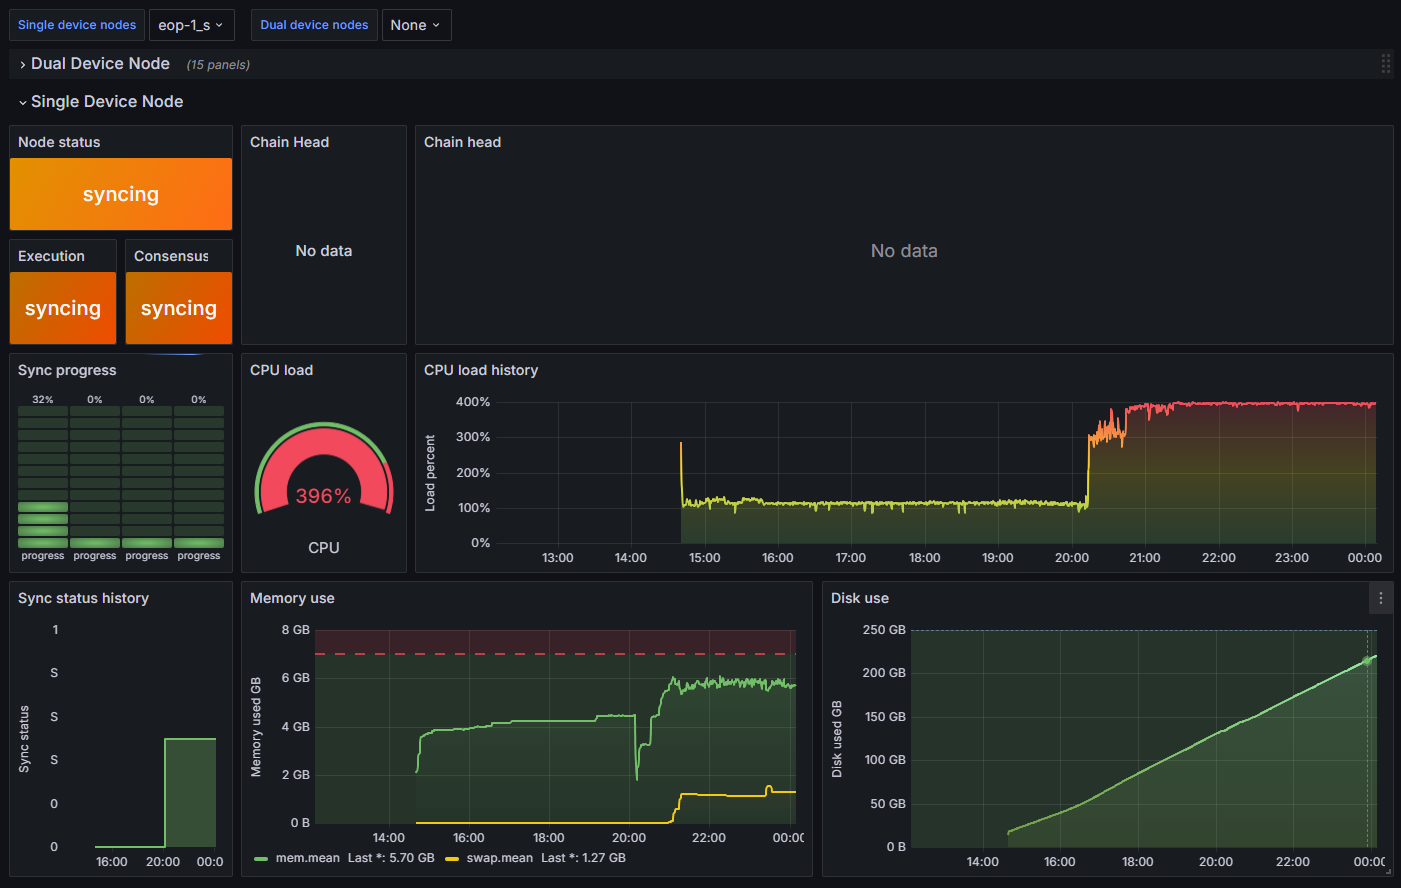
Grafana dashboard/Sync in progress
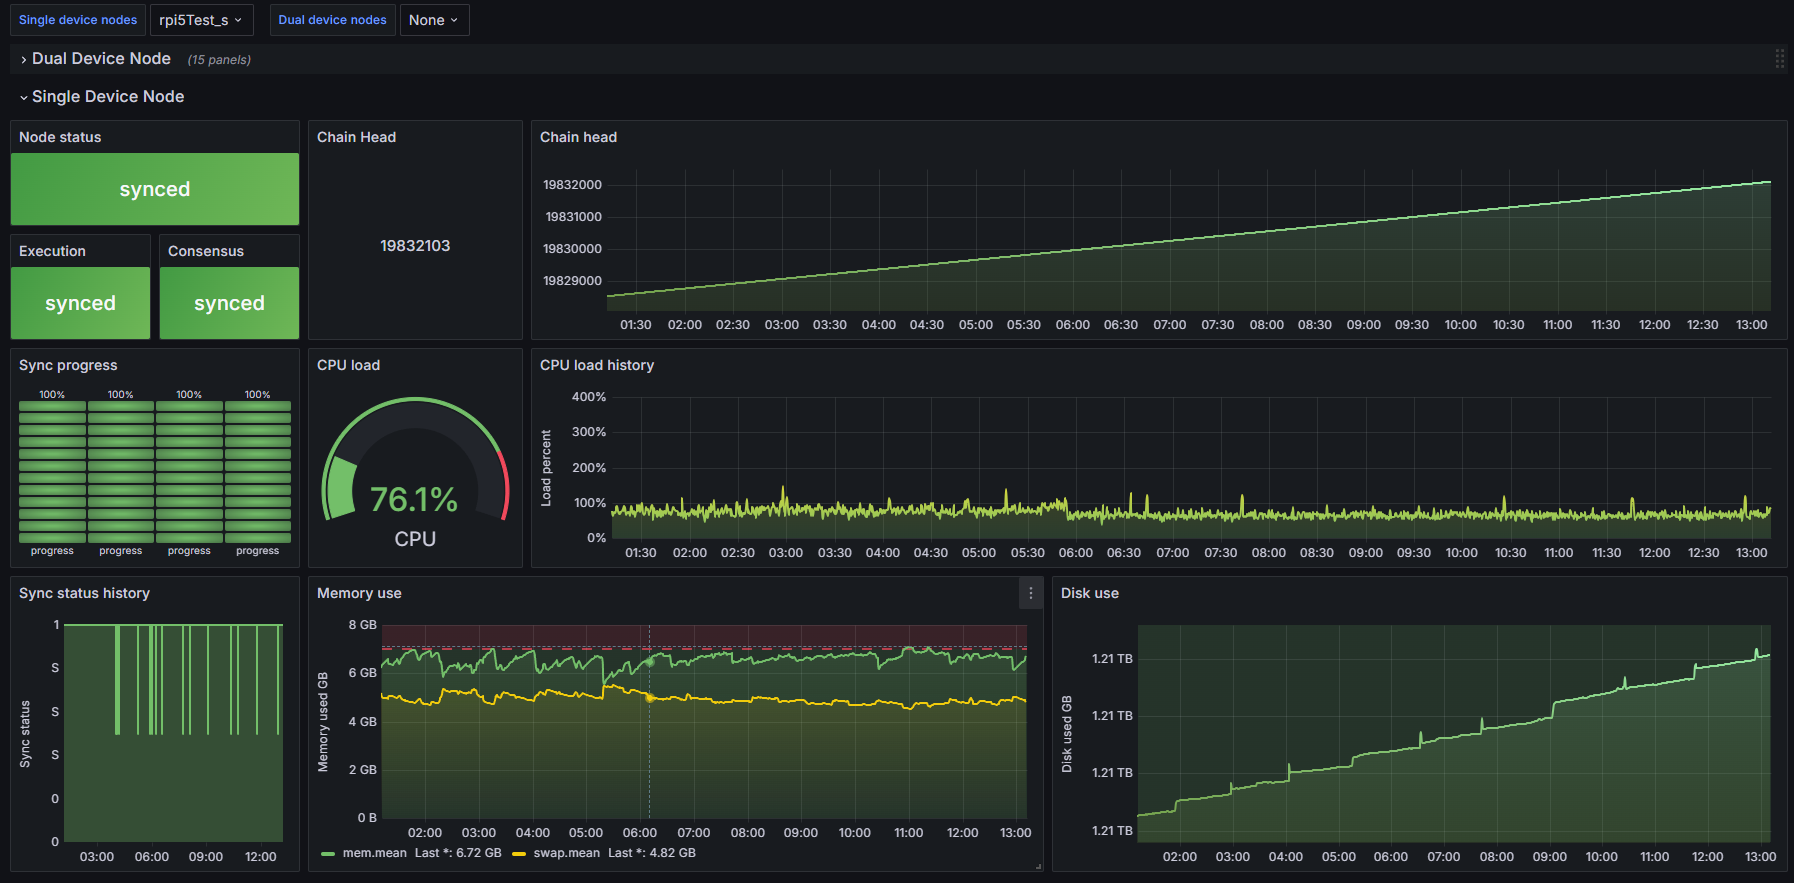
Grafana dashboard/Sync completed
Account Verification
- SSH login into the device as ethereum/ethereum
Note
- If the ethereum user does not exist, it means that the installation failed unexpectedly (in such case, contact the support)
- By default, ethereum user is forced to change the password during the first login
Network Configuration Verification
- From Raspberry Pi device run the command:
PING google.com (142.250.186.206) 56(84) bytes of data.
64 bytes from waw07s05-in-f14.1e100.net (142.250.186.206): icmp_seq=1 ttl=59 time=2.83 ms
64 bytes from waw07s05-in-f14.1e100.net (142.250.186.206): icmp_seq=2 ttl=59 time=3.62 ms
64 bytes from waw07s05-in-f14.1e100.net (142.250.186.206): icmp_seq=3 ttl=59 time=2.23 ms
64 bytes from waw07s05-in-f14.1e100.net (142.250.186.206): icmp_seq=4 ttl=59 time=3.73 ms

--- google.com ping statistics ---
4 packets transmitted, 4 received, 0% packet loss, time 3005ms
rtt min/avg/max/mdev = 2.229/3.102/3.734/0.614 ms
Summary
At this point, the device is configured and ready to host an Ethereum Node.
If you have default config.txt, Geth, Nimbus and monitoring software will start automatically as a service.
For more information on configuring or modifying elements of Web3 Pi installation, please read the Advance Settings section of this documentation.